Showing posts with label zakka. Show all posts

Sunday, November 18, 2012

Dream Home progress


Hi all!
Before you all think this blog has gone all weird (suddenly reviewing beauty products? isn't this a home blog?), I better post a little about the progress of our new home. I'll tell you why those beauty-related posts got onto this blog another time.

Anyway, WE GOT OUR KEYS!!! Super excited! Nothing beats the first time you rush up there, open the main door and gaze into your future home and explore every crook and cranny. I wanted to move in there immediately, who cares if there's no water or electricity or even floors! LOL.

Yeah but common sense kicked in and we are forging ahead with our renovation plans. Really excited. We are using Francis Tan from Ciseern and so far the experience has been good. We were at a Home exhibition at Expo a couple of months back, starting our research and sourcing for designers. We walked past the Ciseern booth and were approached by Francis. Since we went to the Expo with the purpose of sussing out potential renovation firms, of course we gave his sales talk a chance. He showed us around the show flat and introduced some of their star features.

We sat down to chat and he introduced us the packages that Ciseern offered and before we knew it, we signed up for their 4-Room package. Now this is sooo not me. I'm the type that researches and checks for reviews just to buy an eyeliner. Signing on the spot was giving me major jitters.

But I guess what made me trust Francis and sign for the package was mainly because he understood what zakka was. Do you know how hard it was to explain my dream home style to the friends and family who asked me? Gosh I do not want to have to go the whole to the most important person in my dream home design process - my designer. But Francis, having studied design in Japan, understood zakka which made communication a lot easier. He was also easy to talk with and not pushy. The ever-supportive hubby also gave me the assurance saying how often do you meet someone who understand your style? He was totally with me on having zakka as our home theme. Love.

Back to Francis. One could tell he really had the customer in mind. So far, he has been attentive and responsible and the renovation progress has been smooth. The actual work hasn't started yet but we have been busy picking out all the necessary materials and colours. It's tiring but really fun and exciting. It totally makes me happy to have a hand in building up my dream home.

Wow after more than 2 years finally from this:


to this:


Our beloved home!


Our main gate...entrance to our love nest! (I blurred out my unit-no of course, the top part doesn't actually look like this)


Living room


Entryway


Little nook for dining area


Living room


Bedroom 2


Bedroom 1


Master bedroom


Storeroom


Common bathroom


Master bathroom


View from the master bedroom window


The neighbourhood

It'll be very interesting and fun to post weekly progress photos of our dream home's renovation. I hope I can keep up with that!

Til next time <3 p="p">


Saturday, November 5, 2011

Love: Shinzi Katoh and Young Hearts

Zakka lovers alert!

Famous Zakka artist Shinzi Katoh has collaborated with Young Hearts, the lingerie line, to produce a special limited edition collection of home wear and pajamas!

That's right, you can finally buy and wear Shinzi Katoh designs in Singapore!

I was so thrilled to discover this collaboration in Intimate Closet, a store that carries Young Hearts among other lingerie brands and I knew I had to get a set even though I don't wear PJs.


Isn't this just adorable?? I got a set that is a short-sleeved top and shorts in my favourite A Little Red Riding Hood design. They also have the Cheri and Cinderella series. I just have this thing for Little Red Riding Hood, especially Shinzi Katoh's. Now when you buy a set, it comes with a matching little eco drawstring bag where you can keep your precious set in.


A closer look at the pretty little bag.


All ready to go!


Look at the adorable little details. Who could be afraid of this cute little wolf?

I'm a really skinny little person and the smallest size they had was medium, I haven't tried the set myself (couldn't bear to wear it heehee) but hey home wear is supposed to be loose fitting and comfy aint it?

Also as an extra treat, when you buy any set you are entitled to buy his other merchandise at 40% off!! I didn't manage to take any photos in the store but there were an iPhone 4S cover (only one design, a pouch, a card holder and a large tote bag.

I picked the tote bag.


There are 3 designs and I picked the classic red and white polka-dotted one. It's really roomy and great for shopping.


Back view.


You can browse the complete collection here. Hurry get your set now before it's all gone!

Tuesday, March 15, 2011

Home dream : Neëst - Scandinavian and Japanese loveliness

Neëst - a shop filled with everything lovely of Scandinavian and Japanese design.

Scandinavian and Japanese??? How did the two of them get mixed up together, you say?? It might seem like a weird combination but trust me these two works perfectly together. It is also my ideal decorating style for our future nest.

Both styles are famous for their simplistic design and clean lines, with a strong emphasis on natural looks and style of life. When they come together, magic happens.

And Neëst is the epitome of this ideal.


1. Cara cup
2. Kakudo wall clock
3. Small maple bowl
4. Lotus tea serveur

2. Panier baby
3. Brush "Duck"
4. Mini glass vase


Aren't they just lovely? I would love to have all these in my home.
Be sure to check out their blog too!

Friday, February 25, 2011

Craft Project: No Sew Lanyard and Card holders


Presenting my latest little DIY project!!
These ideas have been bugging in my head ever since I bought these lovely polka-dotted fabric from Chinatown. So in my little self-given holiday I decided to finally put them to fruition.

Lately my sister and I have been going crazy over everything polka-dotted. Especially stuff from Cath Kidston, the mother of all things polka-dotted. Like how cute are her designs below!!


Bowls

Saddle Bags

All images from Cath Kidston

Polka dots and florals are very popular this year and you can see them popping out everywhere. When I saw this fabric in Chinatown, I couldn't resist getting a metre of each to play with.

See how pretty!

I made 3 things this afternoon. A lanyard to use with my existing pass holder, an ezLink card holder and a staff pass holder. And they are very simple to do, no sewing needed!!

Oh yes and I HAVE to mention my other inspiration for this project.

It all started with this amazing tip I read from this really great blog, How About Orange, titled 'How to Stiffen Fabric'. This was a really simple idea with tons of possibilities! By stiffening fabric, it takes on the property of paper, allowing it to be foldable and flexible BUT with the durability of fabric!! How genius is that!

Jessica from How About Orange then went down to share a couple more tutorials she'd come up with. You have GOT to check them out.


I've been itching to try stiffened fabric since I read those tutorials so here's my version!

1) Lanyard


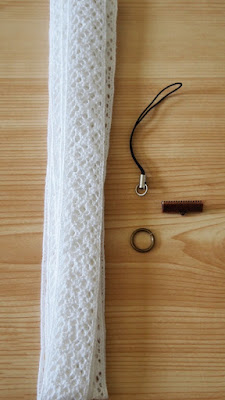
I got this really pretty lace at Daiso (only $2, cheap cheap). You'll also need a mobile phone string, a sort of clamp thing for gripping onto ribbons and a jump ring (mine was 12mm).
You can also make this with any sort of ribbon. I find 2cm wide ribbons a perfect width.

Cut your ribbon to the length you want. It can be any length you're most comfortable with and which makes it easy for you to put on and remove your lanyard.

After cutting, put the the ends together, fold over a little and apply glue. You then use the clamp thingy to grip the end.


Like so. Use jewelry pilers to really close it tight. 


I had to use a smaller jump ring first because the hole at the end of the clamp was rather small. After clamping the end of the ribbon, attach the small jump ring, followed by the 12mm one and finally the mobile phone string.

You can now attach to it to any card case or even you mobile phone!
Quick and easy!

2) ezLink card holder

Also applicable for business cards.

Measurements: 17.5cm by 6.5cm


Measure out the size onto paper first then pin your template onto your fabric.

Cut out for both fabrics.

Spray the 2 pieces with fabric starch and really soak them through. Iron them with a dry iron, no steam. My fabric was ordinary cotton so I needed at least 2 to 3 layers of starch to make it really stiff. If you're using heavier fabric, you won't need as much. Then again, it's also up to how stiff you want the fabric to be. When ironing, apply the iron gently. I have found out that with the high heat setting for cotton, setting the iron right down onto the fabric rumples it up and it'll be hard to iron out the creases out later.


After ironing the fabric, apply glue all around the edge and stick them together. Now's a good time to trim uneven edges or fraying thread. Fold it over, leaving about 1cm of space and use the iron to give it a nice crisp fold.

And you're done!!

3) Staff pass holder

The steps are basically the same as the ezLink card holder above with a few additional steps. As it is a staff pass holder, naturally you'll need a window so that your staff pass can be shown.

Repeat steps for making the ezLink card holder up to the point where you have your stiffened fabric. Before glueing them together, do the steps below:


Cut a piece of plastic of the same size. I used book wrapping plastic easily found in Popular bookstore. Pin your two pieces of fabric together as shown.


Mark out about 1cm from the edge all round and cut out the centre portion.


Cut a small length of ribbon, fold over and glue it onto the wrong side of the outer fabric first. 


Glue on the piece of plastic and finally the inner layer of fabric.

This time fold equally and glue the sides.


Simple??
For glue, I recommend Beacon's 3-in-1 Advanced Craft Glue.
Really strong and fast drying.

Now I have yet to really put my projects to the test, i.e. daily use and wear and tear. Please bear in mind that these are no-sew projects and done using only glue, so for those who are doubtful that they will hold, you may add a couple of stitches for security.
Hope you liked them!!


LinkWithin

Related Posts with Thumbnails