Showing posts with label craft. Show all posts

Monday, April 18, 2011

DIY Love: Secret Storage Books

Storage.

That is always a problem for me.
I have tons of stuff. Magazines, scrapbooking materials, craft supplies and I swear they seem to grow in size on it's own. Like a little monster in my cupboards.

Storing things away neatly to reduce the unsightly clutter and also for easy usage just makes sense but it is not always an easy thing to do.

I'd hate to have big plastic crates all stacked up in the corner of my room because well it's just plain ugly. Therefore I am forever on the quest to find pretty yet practical storage solutions that doesn't bust my piggy bank.

Here's one great idea I found on Design*Sponge


Brenna's Secret Storage Books!
Just the name itself sounds fun. Like those books you used to see in the movies where people would use to hide money or treasure in. It also reminds me of the decorated boxes I gave my best gal pals for Christmas.

It looks really easy to make and you can easily label and store craft items in them. Or make it as a letter writing kit to give to friends. People don't write enough letters nowadays and it's always nice to get snail mail.

Check out how to make them here!


Saturday, March 5, 2011

Sweet Paul: Spring 2011

I can't believe I'm so slow!
I keep forgetting to introduce you all to this amazing online magazine from Sweet Paul!

Yes Sweet Paul's Spring 2011 - Special Kid's issue is out!!

Check out the cover, the strawberry milkshake with marshmellows looks so yummy. Slurp!

Sweet Paul is a food and prop stylist and an amazing crafter too! He has been coming up with these gorgeous e-mags for sometime now and I loved his Holiday 2010 issue. It gave me a lot of inspiration for my holiday crafts. His blog is also a haven of recipes and easy yet really pretty crafts. 

The Spring 2011 issue is really adorable and full of fun tips, crafts and recipes to enjoy with your children. Oh wait, did I mention it's all free??! That's right! You can view the e-mag online and download it as a PDF file for FREE!! God bless you Sweet Paul!


Don't forget to check it all out here!


Friday, February 25, 2011

Craft Project: No Sew Lanyard and Card holders


Presenting my latest little DIY project!!
These ideas have been bugging in my head ever since I bought these lovely polka-dotted fabric from Chinatown. So in my little self-given holiday I decided to finally put them to fruition.

Lately my sister and I have been going crazy over everything polka-dotted. Especially stuff from Cath Kidston, the mother of all things polka-dotted. Like how cute are her designs below!!


Bowls

Saddle Bags

All images from Cath Kidston

Polka dots and florals are very popular this year and you can see them popping out everywhere. When I saw this fabric in Chinatown, I couldn't resist getting a metre of each to play with.

See how pretty!

I made 3 things this afternoon. A lanyard to use with my existing pass holder, an ezLink card holder and a staff pass holder. And they are very simple to do, no sewing needed!!

Oh yes and I HAVE to mention my other inspiration for this project.

It all started with this amazing tip I read from this really great blog, How About Orange, titled 'How to Stiffen Fabric'. This was a really simple idea with tons of possibilities! By stiffening fabric, it takes on the property of paper, allowing it to be foldable and flexible BUT with the durability of fabric!! How genius is that!

Jessica from How About Orange then went down to share a couple more tutorials she'd come up with. You have GOT to check them out.


I've been itching to try stiffened fabric since I read those tutorials so here's my version!

1) Lanyard


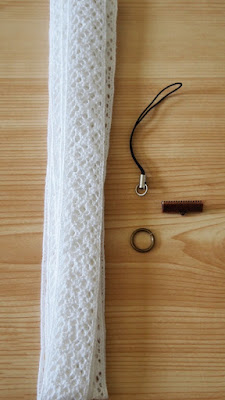
I got this really pretty lace at Daiso (only $2, cheap cheap). You'll also need a mobile phone string, a sort of clamp thing for gripping onto ribbons and a jump ring (mine was 12mm).
You can also make this with any sort of ribbon. I find 2cm wide ribbons a perfect width.

Cut your ribbon to the length you want. It can be any length you're most comfortable with and which makes it easy for you to put on and remove your lanyard.

After cutting, put the the ends together, fold over a little and apply glue. You then use the clamp thingy to grip the end.


Like so. Use jewelry pilers to really close it tight. 


I had to use a smaller jump ring first because the hole at the end of the clamp was rather small. After clamping the end of the ribbon, attach the small jump ring, followed by the 12mm one and finally the mobile phone string.

You can now attach to it to any card case or even you mobile phone!
Quick and easy!

2) ezLink card holder

Also applicable for business cards.

Measurements: 17.5cm by 6.5cm


Measure out the size onto paper first then pin your template onto your fabric.

Cut out for both fabrics.

Spray the 2 pieces with fabric starch and really soak them through. Iron them with a dry iron, no steam. My fabric was ordinary cotton so I needed at least 2 to 3 layers of starch to make it really stiff. If you're using heavier fabric, you won't need as much. Then again, it's also up to how stiff you want the fabric to be. When ironing, apply the iron gently. I have found out that with the high heat setting for cotton, setting the iron right down onto the fabric rumples it up and it'll be hard to iron out the creases out later.


After ironing the fabric, apply glue all around the edge and stick them together. Now's a good time to trim uneven edges or fraying thread. Fold it over, leaving about 1cm of space and use the iron to give it a nice crisp fold.

And you're done!!

3) Staff pass holder

The steps are basically the same as the ezLink card holder above with a few additional steps. As it is a staff pass holder, naturally you'll need a window so that your staff pass can be shown.

Repeat steps for making the ezLink card holder up to the point where you have your stiffened fabric. Before glueing them together, do the steps below:


Cut a piece of plastic of the same size. I used book wrapping plastic easily found in Popular bookstore. Pin your two pieces of fabric together as shown.


Mark out about 1cm from the edge all round and cut out the centre portion.


Cut a small length of ribbon, fold over and glue it onto the wrong side of the outer fabric first. 


Glue on the piece of plastic and finally the inner layer of fabric.

This time fold equally and glue the sides.


Simple??
For glue, I recommend Beacon's 3-in-1 Advanced Craft Glue.
Really strong and fast drying.

Now I have yet to really put my projects to the test, i.e. daily use and wear and tear. Please bear in mind that these are no-sew projects and done using only glue, so for those who are doubtful that they will hold, you may add a couple of stitches for security.
Hope you liked them!!


Wednesday, February 16, 2011

Bridesmaid Invite Reveal!!

I am most excited to reveal the photos for my bridesmaids' invites! Actually I gave them out in Dec but only got round to posting the photos now ;p

Most brides in Singapore or perhaps even Asia have a brood of 'sisters' or 'Jie Mei-s (姐妹)to help out with the nitty-gritties of the actual day. Similarly the groom will also have a bunch of 'brothers' or 'Xiong Di-s' (兄弟)as support.

They are normally siblings or best friends and can go from 3 to even a dozen of them. They form an integral part of the celebrations and are a great help to any bride and groom, helping them from dressing up to handling guests at the reception.

Usually the bride and groom will ask their friends and siblings to be their 'sisters' and 'brothers' either by just asking, through SMSes or emails or even by just involving them in the wedding discussions.

My 'sisters' comprise of my very own sister, cousin and best galfriends from various stages of my life. They are my dearest gals and it means a lot to me to have them by my side on my biggest day, thus I thought I couldn't ask them any old way. Plus it's a good chance for me to try out some of the many DIY projects I've found on the wedding blogs I've been following!

Ready?
Here we go!


I made them using the fabric envelope how-to and recipe card template at Wedding Chicks.


For the recipe cards, I used Halo Handletter font and edited the template using Photoscape. If only I had started using Photoshop earlier, then my bridesmaid invites would have followed the same theme as the wedding invites I'm now designing.


For the labels, I printed their names using Carbon Type font and cut them out. I punched out the sakura shape using a paper punch. I used ordinary pink envelopes bought from Popular and the fabric is my favourite candy stripe from Spotlight. I bought the bubblegum bakers twine from Made with Love at Plaza Singapura.

There you go! My recipe for a perfect wedding day, having my 8 lovely, gorgeous, adorable sisters by my side!

They were loads of fun to do and I loved the reactions I got out of giving them. They ranged from the usual "Oh so sweet and pretty" to an incredulous "Are you serious??" (which I wasn't sure whether it was because I did an actual invite or that I'm asking her as my bridesmaid haha) to my favourite "OMG YES! YES! YES!" One would think I had just proposed to her if they didn't know better LOL.

If you are also interested to do your own invites, there's a plethora of free editable templates by kind-hearted very talented people online. Places like Wedding Chicks, Martha Stewart Weddings and Project Wedding Blog are good places to start.


Saturday, January 1, 2011

My Christmas handmade gifts

For my colleagues


2011 calendars that I designed using brushes I downloaded from here

For my dearest girlfriends
Personalised 2011 organisers and pouches in boxes I decorated with washi tape


I'm a little knackered out from the festive chaos so if I ever have the energy I'll share how I made these.

Meanwhile it's 2011 so wedding preparations are gonna take a big step forward! It's gonna be very exciting so I hope I have lots more posts to share with you all.

Enjoy the first weekend of 2011 and Happy New Year to all!

LinkWithin

Related Posts with Thumbnails