Friday, February 25, 2011

Craft Project: No Sew Lanyard and Card holders


Presenting my latest little DIY project!!
These ideas have been bugging in my head ever since I bought these lovely polka-dotted fabric from Chinatown. So in my little self-given holiday I decided to finally put them to fruition.

Lately my sister and I have been going crazy over everything polka-dotted. Especially stuff from Cath Kidston, the mother of all things polka-dotted. Like how cute are her designs below!!


Bowls

Saddle Bags

All images from Cath Kidston

Polka dots and florals are very popular this year and you can see them popping out everywhere. When I saw this fabric in Chinatown, I couldn't resist getting a metre of each to play with.

See how pretty!

I made 3 things this afternoon. A lanyard to use with my existing pass holder, an ezLink card holder and a staff pass holder. And they are very simple to do, no sewing needed!!

Oh yes and I HAVE to mention my other inspiration for this project.

It all started with this amazing tip I read from this really great blog, How About Orange, titled 'How to Stiffen Fabric'. This was a really simple idea with tons of possibilities! By stiffening fabric, it takes on the property of paper, allowing it to be foldable and flexible BUT with the durability of fabric!! How genius is that!

Jessica from How About Orange then went down to share a couple more tutorials she'd come up with. You have GOT to check them out.


I've been itching to try stiffened fabric since I read those tutorials so here's my version!

1) Lanyard


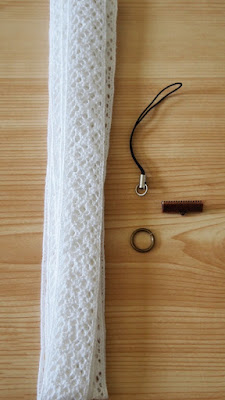
I got this really pretty lace at Daiso (only $2, cheap cheap). You'll also need a mobile phone string, a sort of clamp thing for gripping onto ribbons and a jump ring (mine was 12mm).
You can also make this with any sort of ribbon. I find 2cm wide ribbons a perfect width.

Cut your ribbon to the length you want. It can be any length you're most comfortable with and which makes it easy for you to put on and remove your lanyard.

After cutting, put the the ends together, fold over a little and apply glue. You then use the clamp thingy to grip the end.


Like so. Use jewelry pilers to really close it tight. 


I had to use a smaller jump ring first because the hole at the end of the clamp was rather small. After clamping the end of the ribbon, attach the small jump ring, followed by the 12mm one and finally the mobile phone string.

You can now attach to it to any card case or even you mobile phone!
Quick and easy!

2) ezLink card holder

Also applicable for business cards.

Measurements: 17.5cm by 6.5cm


Measure out the size onto paper first then pin your template onto your fabric.

Cut out for both fabrics.

Spray the 2 pieces with fabric starch and really soak them through. Iron them with a dry iron, no steam. My fabric was ordinary cotton so I needed at least 2 to 3 layers of starch to make it really stiff. If you're using heavier fabric, you won't need as much. Then again, it's also up to how stiff you want the fabric to be. When ironing, apply the iron gently. I have found out that with the high heat setting for cotton, setting the iron right down onto the fabric rumples it up and it'll be hard to iron out the creases out later.


After ironing the fabric, apply glue all around the edge and stick them together. Now's a good time to trim uneven edges or fraying thread. Fold it over, leaving about 1cm of space and use the iron to give it a nice crisp fold.

And you're done!!

3) Staff pass holder

The steps are basically the same as the ezLink card holder above with a few additional steps. As it is a staff pass holder, naturally you'll need a window so that your staff pass can be shown.

Repeat steps for making the ezLink card holder up to the point where you have your stiffened fabric. Before glueing them together, do the steps below:


Cut a piece of plastic of the same size. I used book wrapping plastic easily found in Popular bookstore. Pin your two pieces of fabric together as shown.


Mark out about 1cm from the edge all round and cut out the centre portion.


Cut a small length of ribbon, fold over and glue it onto the wrong side of the outer fabric first. 


Glue on the piece of plastic and finally the inner layer of fabric.

This time fold equally and glue the sides.


Simple??
For glue, I recommend Beacon's 3-in-1 Advanced Craft Glue.
Really strong and fast drying.

Now I have yet to really put my projects to the test, i.e. daily use and wear and tear. Please bear in mind that these are no-sew projects and done using only glue, so for those who are doubtful that they will hold, you may add a couple of stitches for security.
Hope you liked them!!


Monday, February 21, 2011

eClarity: the perfect place to get your wedding bands

I was first introduced to eClarity by an ex-colleague of mine 'Ivy Guru'. She is also preparing for her wedding and a fellow DIY enthusiast. She is also super talented and really a guru in many areas.

Previously we had looked at regular jewelry stores like Goldheart, Soo Kee and Love & Co. Actually the only store we really shopped through is Love & Co, known for it's wide selection and focus on wedding bands. We did see a couple of designs that we liked and thought of going back for a proper selection.

That is until 'Ivy Guru' introduced me to eClarity and I am so glad she did!!

eClarity started as an online jewelry store and later branched out into retail. They hardly advertise and rely on word-of-mouth from its customers. And with it's reasonable prices, good customer services, unique designs and customisations; it is no wonder word spread quickly!!

The first tick of approval comes from the fact that they display their wide range of designs and it's prices on their website. I liked that they are transparent in showing their pricing so that you can know what sort of price range they have and manage your budget and expectations.

They do not entertain walk-ins and you will have to contact them for an appointment. Contact details can be easily found on their website.

Here are their opening hours:


Mondays to Fridays: 1pm to 7.30pm

Saturdays: 11am to 2.30pm
(Closed on Sundays and Public Holidays)


(taken from eclarity.com.sg)

Their retail store is located at Shaw Centre Level 3, not the Isetan side. We had a bit of trouble finding it yesterday haha. At first sight, it doesn't look like anything much. No plush carpets or luxurious wallpapers. No uniformed staff or fancy teas served. In fact it looks a little old but it was bustling with customers. 

I wasn't sure if photos were allowed so I just sneaked this vague photo of the store

We were shown trays and trays of rings with the instructions to view them as just inspirations. That's the way eClarity operates. While customised rings are the exception in other stores and every little thing you want specially done is chargeable, over at eClarity's things work differently. They show you loads of designs and you pick out the ones that catch your fancy. With the shortlisted ones, you can slowly peruse them. If you like one of these designs present, you could pick those or if you like 2 or more of the designs and couldn't decide, you could combine the details you liked best into a truly unique ring of your own!!

That's right, their rings are totally customisable! From type of gold to type of finish to number of diamonds to width of rings to engravings, it is all up to you!
Like the design of the ring but not it's finish? You can change it!
Like the ring but too little diamonds? You can add more!
With the wide range of details that you can customise, I dare say that each pair of bands will be uniquely yours! One of a kind.

The first pair we looked at caught our eyes immediately. It was an intertwined band of white and black gold. Technically the black gold they have is rhodium plated gold but it looks so nice! In fact before seeing the rings we were thinking whether there's such a thing as black gold and how interesting that would be in rings!

So we used that pair as the foundation for our design and changed some elements.


We swapped the two different bands of gold, the original design had the matte black gold at the bottom and glossy white gold at the top.  We changed it to the matte black gold at the top and chose a glossy champagne gold at the bottom to bring out the matte black gold. His was unadorned while I had a simple diamond on mine. Simple and enduring to look at. Just the way we want it.

We totally loved our rings!! It'll take one to two months for them to be ready, can't wait to see them! Besides wedding bands, they also have regular jewelry and are a popular choice for engagement rings. In the month of February, they are offering free engravings so check out their webbie now!


Sunday, February 20, 2011

1st Gown selection!!

Wedding-y day yesterday!! Went  with HTB to eClarity to check out wedding bands and then with my two gals Alicia and Joyce to The Aisle for my first official gown selection.

We had a great time at eClarity, so much so that I need to dedicate a whole post to it. They are the best!!

I had invited all 8 of my sisters for the big gown event but most of them couldn't make it that day. Thankfully I still have Alicia and my little sis to help me decide and give opinions!!

The appointment's at 6.30pm and we stayed for about 2 hours, happily trying on gowns.

But enough talk...Pictures!!!

Me and darling Alicia

Me and my dearest little sis

Pretty gowns all in a row

A growing stack of gowns for me to try

All excited to get started!

Cam-whoring first!

Ivory satin and taffeta. Like the flower.


 A favourite with my 2 gals. This has flowers and feathers as embellishments.


 Sexy see through crystal-embellished back


 My absolute favourite!!! LOVE the dramatic long ribbon sash!!!! Soooo gorgeous!!

 Totally adore the front too!! Clean and simple. Nice lines and textures.
Definitely short-listed as one of the choices for my morning gown.

 I like this simple classy look too.

 Tried a short gown as a trial for my 2nd march-in gown. Suitable for mingling with friends and family. Eddie thinks this looks great on me and the white and black does make a very good contrast. Very elegant. But not in tune with my palette so I'll KIV this.

 Presenting a very strong contender for THE GOWN
A rosy pink corset with fluffy tulle/organza full ball-gown skirt. 

 It has a line of crystals along the hem of the bustline and it'll come with a couple of white flowers along the side of my hip and a white satin ribbon at the centre of the bustline. I can imagine it now, it'll look amazing. 

 Very princess-y and dreamy, no?


It was really fun and I can't wait to try out more gowns :).
My next appointment's 7 May and HTB has appointment for his suit fitting on 13 May.
Can't wait!!

LinkWithin

Related Posts with Thumbnails